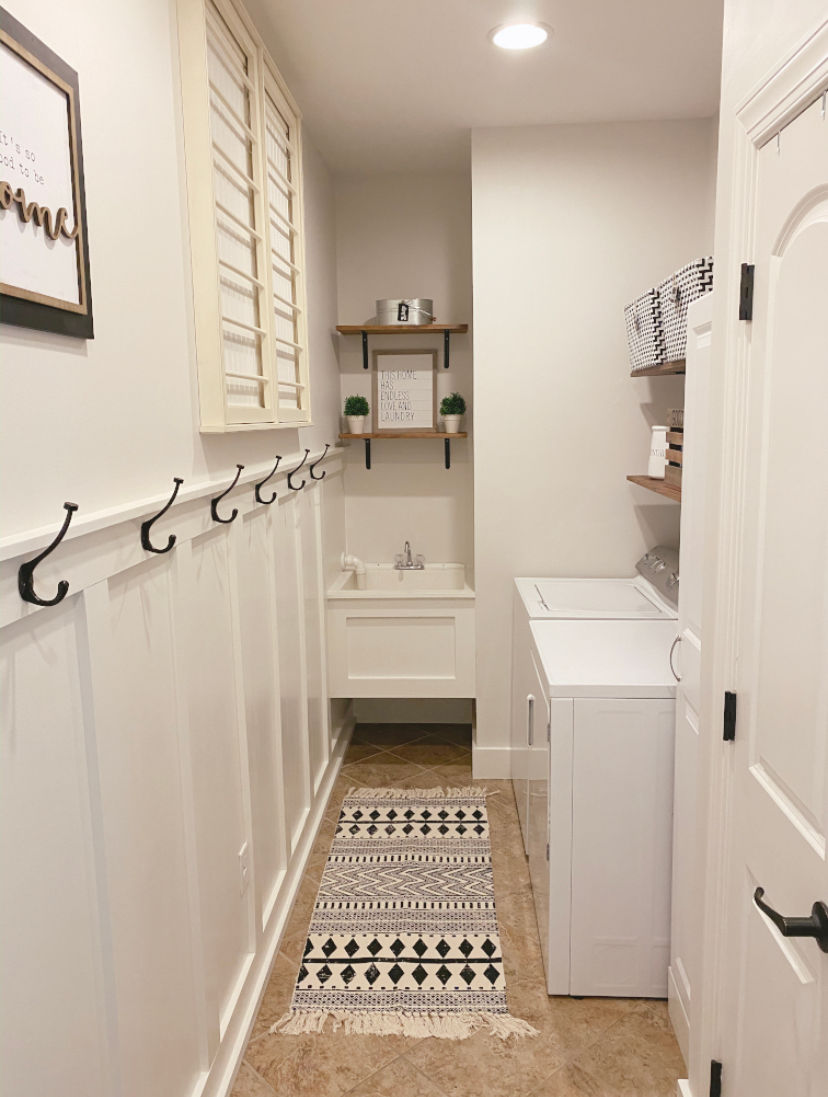
LAUNDRY ROOM MAKEOVER
- Amanda Vaughan
- Jan 23, 2020
- 3 min read
This Laundry Room Makeover was looonng overdue...but committing to an organization challenge was just what I needed to GET IT DONE!

As embarrassing as this "Before" picture is...you needed to see what I was working with. Stuff...lots and lots of stuff!
Welcome to our Laundry Room, aka Mud Room, aka "the dumping ground"!
Anyone else following the Bowl Full of Lemon's Organization Challenge? I have to admit...I start one of these Clean Out/Declutter/Organizing Challenges every year and I am ALWAYS A DROPOUT. This year my friend Melissa at Life With Less Mess has been posting tips and info about the challenge (CHECK OUT HER PAGE! I seriously strive to be her!) I decided to DO IT...even if that means I go at my own (turtle-like) pace.
When I informed my husband that I was going to paint the laundry room (it was much needed...check out the drywall repair from 2 years ago in the Before Pics) and make my own shelves...he said "No!" OK, well he laughed...then said no. He just didn't trust in my skills.
Tackling The Mess
Our Laundry Room also acts as our mud room where everyone drops everything and is the door that most people come in and out of our house. We had hooks full of coats, purses, hats & book bags and baskets full of shoes, pool towels and cleaning supplies. I needed to find a place for everything!

We purchased a tall, white utility cabinet from Lowe's which my husband also built a platform for to make it taller and fill the space. I knew I would use this to hide our laundry basket and kids shoes. (My kids tend to walk in the door from sports and throw uniforms, socks, etc. on the floor...we need a laundry basket to collect all the dirty, stinky clothes.) #sportsmom I used baskets I already had and added this popular Laundry Co. sign to finish out the decor above the washer and dryer.

I also removed the wire shelves and purchased wood and black brackets from Lowe's and had my husband cut it down for me. I used stain that we already had at home. The total cost for 4 shelves was under $40. We gave it a fresh coat of paint (we used Sherwin Williams Alabaster) and my husband added a board and batten wall with hooks for the kids coats and book bags. I have a drying rack (that I LOVE) that I've had for 13+ years. After the wall was built, we realized the rack would have to hang very high. Poor planning on our part...but I still refused to go without my drying rack. Check out the newer versions: here #dryingrack I also added a sign with one of my favorite sayings..."It's So Good To Be Home". This sign is from Kirklands and no longer available...but I found a similar sign here.

One of my favorite things my hubby did was remove the legs from our less than attractive utility sink and built a platform for it, added wood to the front and dressed it up with trim. This gave it an updated look. I was ready to remove it all together but it comes in handy giving the puppy a bath. I added some decor I already had and a sign from Hobby Lobby! #hobbylobby
I decided to simplify our old "command center" where we had a To-Do List and Calendar. I realized we only used our phone calendars anyway and not using this would add clean wall space. I purchased this magnetic board from Hobby Lobby and added a magnetic To-Do List and will use it for important things like game schedules or the lunch menu.

I also added a rug set from Amazon that was super cheap! It comes with matching rugs in 2 different sizes so it was perfect for the door and in front of the washer and dryer! Gotta love Free One Day Shipping! I will add more links to items as I get them up, but wanted to share with you my progress so far. Be sure to follow me here! That is the best place to get access to links for items I purchase. It took us 3 weeks to complete the Laundry Room which puts me 2 weeks behind...but who's counting! :) On to the next room!
#organizing #bowlfulloflemons #challenge #farmhousedecor #laundryroom #amazon #hobbylobby #kirklands #sherwinwilliams


Comments